What can be better than a chocolate cake with rich chocolate buttercream filling and chocolate ganache icing? Not much you say? How about decorating the top of the cake with caramelized candied hazelnuts? It is a work of art in itself! It is as if the hazelnuts are defying gravity! It isn't magic, but close to it!
If you attempt to make these delicious beauties, here are some helpful tips.
Things you will need:
8 long wooden skewers
8 hazelnuts, toasted and skin removed
1 cup sugar
1/4 cup water
cutting board
parchment paper
Toast the hazelnuts on a cookie sheet at 350 degrees for 15 minutes. When they are slightly warm, place them in a towel and rub them together to remove the skin. Once they are clean, put a wooden skewer into the side of each nut.
Next is the fun part, making caramel! Cook sugar and water in a medium saucepan over medium heat, stirring occasionally, until sugar is dissolved. Continue to cook, without stirring, until syrup comes to a boil, washing down the the sides of the pan with a wet pastry brush to prevent crystals from forming. (Crystallization is what happens when the sugar "crystallizes" on the side of the sauce pan. The sugar needs to stay in the water suspension. Using the water filled pastry brush to "wash" down the sugar crystals will save your caramel from being a grainy mess!). Let the sugar mixture boil until the syrup turns light amber, about five minutes. Remove from heat and let stand until slightly cooled, 4-6 minutes.
When the caramel is still warm, dip a skewered hazelnut into the syrup, coating completely and letting the excess syrup drip back into the pan. When the dripping syrup becomes a thin string, secure the end of the skewer under a cutting board on the edge of a counter to drip onto a piece of parchment paper underneath. Repeat with all hazelnuts. Let them stand until the caramel has hardened, about five minutes. Lastly, break the strings to about four inches. Carefully remove skewers.
Tips: Watch the caramel closely, it can crystallize quickly and or burn. Sometimes adding a tablespoon of corn syrup will prevent crystallization. Work quickly once your caramel is at a warm temperature! It sets fast! It can be reheated in the microwave for about 5-10 seconds if it gets to gooey.
Happy Caramelizing!!!
penelopesperfections.com #newportbeachweddingcakes #costamesaweddingcakes @Perfe1Penelopes #penelopesperfections
Tuesday, January 5, 2016
Thursday, November 19, 2015
Croquembouche....Oui! Oui!
![]() |
| Croquembouche |
What a Centerpiece for any table!! Croquembouche is not only a
beautiful adornment for a Holiday gathering or a Wedding, but is
amazingly delicious as well! It can be a little intimidating at first
to create on your own, but is well worth the effort for the incredible taste!
What is Croquembouche you ask? It is a French Pastry used mostly in Weddings and is also known as Croque-en-bouche which means "crunch in the mouth". The pastry puffs are known also as "choux" and are hollow and filled with vanilla cream or custard. Typically they are held together by toffee or chocolate and then decorated with caramelized spun sugar.
Tradition
has it that the challenge in French Weddings was for these "pastry
puffs" to be stacked as high as possible between the bride and groom and
that they were to kiss each other without disturbing the tall cake
tower. If they achieved a kiss, the marriage was said to bring
prosperity to them. Imagine the disappointment if they brought the
tower down! Traditionally, as well, the Croquembouche was to be hit by a
sword, silver mallet or a champagne bottle as it was believed to be bad
luck to use a knife. In modern day, however, the bride and groom pose
for a picture and the Croquembouche is then served to the guests.
![]() | |
| Chocolate Croquembouche |
Croqumbouche is not only served at Weddings but is great for any get together where a dessert or centerpiece is needed. It is always a crowd pleaser and the center of attention! Penelope's Perfections offers Croquembouche in miniature and regular size!
![]() |
| Traditional Croquembouche |
@Perfe1Penelopes #newportbeachweddingcakes #costamesaweddingcakes #penelopesperfections
Wednesday, November 4, 2015
15 Hot Wedding Cake Trends
https://www.theknot.com/content/wedding-cake-trends
Penelope's Perfections Wedding Cakes / Newport Beach Wedding Cakes / Costa Mesa Wedding Cakes @Perfe1Penelopes
Wednesday, October 21, 2015
Halloween Cake and Cupcake Ideas
It is almost HALLOWEEN again and is time to make some SCARY cakes and cupcakes! Here are some of Penelope's Perfections favorite cakes, cupcakes and cake pop ideas. They can be made easily with just about any cake recipe.
The ghost cake that Penelope's Perfections loves is a chocolate cake recipe with vanilla buttercream icing. It is assembled with vanilla icing between the cake layers and is then iced with a #18 star piping tip vertically until the cake is covered on the sides. Chill for 30 minutes. Next, dark bittersweet chocolate ganache is poured on the top of the cake. Be careful when pouring the ganache so it stays on top of the cake and does not run down the sides! Chill again till ganache is firm. Last, make the ghosts. You can use a chocolate truffle that is smooth or a ball of vanilla fondant for the base of the ghost. Roll out vanilla fondant somewhat thin and ruffle the edges with a ball tool. Cover the truffle with the fondant and place the ghost on the cake! The ghost eyes were piped with ganache. The eyes can be buttercream or chocolate chips as well!
These cute cake pop mummies are so easy and fun to make! Any cake pop recipe will work. Take the cake pop and dip it into melted white chocolate or white candy melts. Let dry on cake pop stand or wax paper. Next, using a small round piping tip, #2 , add some piped lines with the candy melts or white chocolate. The eyes can be added with colored buttercream, piping gel, or ganache.
Here are a few more favorites for Halloween!
Penelope's Perfections Wedding Cakes / Newport Beach Wedding Cakes / Costa Mesa Wedding Cakes
@Perfe1Penelopes
Sunday, October 18, 2015
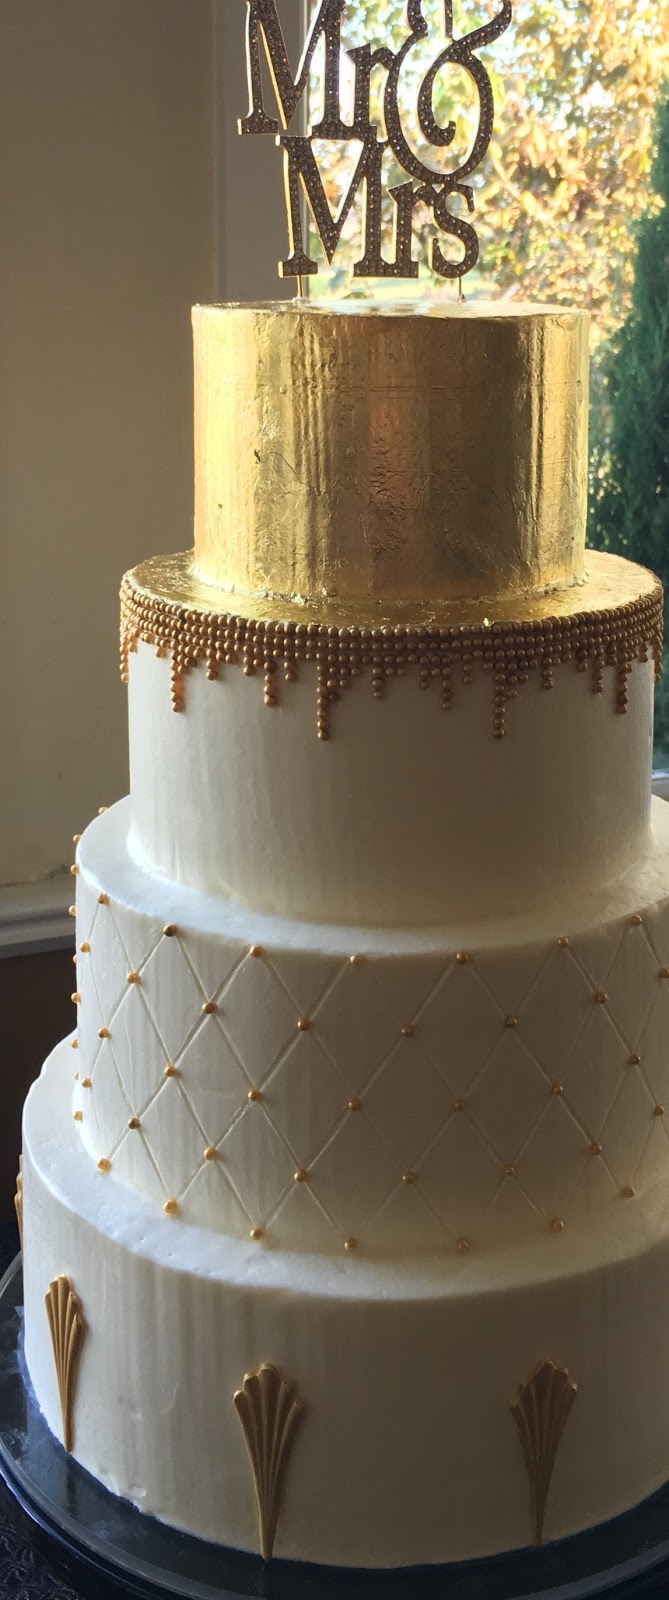
How to Add Gold to Buttercream Wedding Cakes
![]() | |
| Art Deco Wedding Cake |
Two main ways to achieve that sparkling and shimmering appearance of gold is to use luster dust and gold leaf. Gold leaf is definitely the preferred choice because it is real, edible gold. It comes in booklets on loose or transfer paper sheets. The transfer paper is much easier to work with and can be applied easily to any tier of a buttercream cake. The buttercream must have crusted and needs to be firm to the touch, so chill it well! It is best to apply the gold leaf onto the cake tier before assembling the cake so that the base of the cake can be completely covered. When applying the gold leaf, press lightly onto the icing and then remove the transfer paper. Continue until the cake has been covered. That easy! Refrigerating the gold leafing on a buttercream cake really has no effect on the shine. It will form condensation when removed from the refrigerator and back to room temperature, but it still looks great!
The other way to get a metallic gold or silver accent on a Wedding Cake is to use gold luster dusts. There are approved edible metallic luster dusts that can be used. Old Gold Luster Dust is a great choice. It can be used dry or wet. Use luster dust dry and brush it on fondant, white chocolate molds, etc. If you want to color white sugar pearls gold, use the luster dust plus vodka or lemon extract. Simple!
Why not add sparkle to a Wedding Cake?
Penelope's Perfections Wedding Cakes Newport Beach Wedding Cakes. Costa Mesa, Orange County
@Perfe1Penelopes
Friday, September 18, 2015
Chocolate Ganache
![]() |
| Chocolate Ganache Glaze |
Chocolate Ganache!! How heavenly of a flavor you have!! If you are a chocolate lover, ganache is for you!! It is versatile, beautiful on any cake, and the taste is out of this world! What is Chocolate Ganache? It is the French word for heated cream and chocolate mixed together. Simple enough? It is commonly used in truffles, fillings for layered cakes, and used as a glaze on top of almost anything.
How is Ganache made? Ganache is made by heating heavy cream in a sauce pan until the cream begins to barely simmer. When the cream has tiny bubbles around the edges of the pan, it is ready. Overcooking the cream will result in a scorched flavor to the ganache. As soon as the cream is ready, turn off the heat and add the chocolate. The chocolate can be bittersweet, semisweet, or white. The chocolate should be broken into very small pieces for it to melt easier into the cream. Once the chocolate has been added, do not stir for two minutes. This allows the cream and chocolate to assimilate. Once two minutes has passed, gently stir with a whisk in one direction until the chocolate is completely smooth and shiny. Stirring in one direction keeps the ganache from getting air bubbles.
The chocolate to cream ratios do vary a bit when making different types of Ganache. If the chocolate is being used for truffles it is customary to use a 2:1 ratio of chocolate to cream. If it is being used as a glaze or whipped filling for a cake it should be a 1:1 ratio of chocolate to cream.
Once the chocolate ganache is stirred and is shiny it should be placed in a bowl to cool. If it is being used as a glaze to be poured over a cake or dessert it can be used when the temperature is between 86-91 degrees F or a tepid temperature. For truffles the ganache will need to be covered and refrigerated until it is firm, whereas, if it is being used for a cake filling it can be chilled slightly and then whipped like cream in a chilled mixing bowl.
With all the varieties of Chocolate Ganache, it is always a crowd pleaser!!
Penelope's Perfections caters Newport Beach, Costa Mesa, and Orange County areas
Saturday, August 8, 2015
Wafer Paper Flowers
Take cake decorating to an all new level with wafer paper flowers and wafer sheets!! Decorating a buttercream cake doesn't have to be limited to just using piped buttercream.So what are wafer paper flowers? Wafer paper flowers are made from wafer sheets. These sheets are made from potato starch, water, and vegetable oil. They have little to no flavor which makes them perfect to use so they do not interfere with how the cake tastes! Wafer paper comes in packs of 8 x 11 sheets and are white in color. They can be used white or can be colored with food coloring on an edible printer. The sky is the limit on the colors and designs that can be printed and used to make flowers!
So why use wafer paper flowers? If flowers are part of the cake design, there are three choices: real flowers, sugar flowers, or wafer paper flowers. Real flowers are always a great choice but can be expensive. While nothing compares to Mother Nature, sugar flowers and wafer paper flowers can be created to look strikingly realistic. Sugar flowers are made from a paste called gumpaste and fondant and is predominantly made of sugar. They can be colored and dusted to look just like a real flower. They work well on fondant and buttercream cakes but can be a bit heavy on buttercream cakes especially when using a large number of them. Sugar flowers need to be anchored to the cake with floral wire or foam of a sort. Wafer paper flowers are very light, hence the name, and can be attached to a buttercream cake with a dot of buttercream or piping gel. They hold up well on buttercream and fondant icings. Wafer paper flowers are quickly and easily made with no drying time compared to sugar flowers and cost much less than real and sugar flowers.
So when flowers are called for on a buttercream cake, why not try the hottest trend in floral decor, Wafer Paper Flowers!
Subscribe to:
Posts (Atom)